
Introduction
In today’s article we will create managed an Azure Kubernetes Service using Terraform.
For my example’s today, I am running in Windows 10 OS and I use PowerShell for scripting. You can follow the same overall steps in Linux OS as well.
Before starting dipping into details, it’s is important to have the following items :
- An Azure subscription! If you do not yet have an Azure account you can create an account with a few clicks (https://azure.microsoft.com). Azure is giving away a month’s trial with a $ 200 credit.
- Azure CLI, as we are going to make some scripts to create some resources.
- Terraform CLI to execute our automation scripts.
- VS Code or any other text editor.
NOTE : For Windows users, I recommend using the Package manager “Chocolatey” to setup the CLI. As the process of installation is simple. Just copy paste the commands available for each package on your PowerShell terminal.
Terraform CLI : https://community.chocolatey.org/packages/terraform
Azure CLI : https://community.chocolatey.org/packages/azure-cli
Let’s start !😊
Create Terraform Backend in Azure to handle state deployments
Before creating our Azure Kubernetes Service (AKS) through Terraform, It is mandatory to understand the state management in Terraform.
Terraform used what we call the state in order to map what is really created in your infrastructure vs the configuration files you have. That’s to avoid creating or destructing some existing resources or to improve performance when it comes to large infrastructure.
So once you apply multiple deployments based on the same config files, Terraform will use the state to check the changes between your code and the infrastructure and apply only the new changes. This is what we call an idempotent deployment.
By default, Terraform will store this state in your local machine, but it is not a good practice as it will not suits most scenarios where multiple persons should work on the same project, or you have a CI / CD pipeline that handles your automation.
So, Terraform has a feature called backend that will be used to store our state remotely. For our example we will use Azure Blob Storage to store our state.
Let’s first create our blob storage that will store the state.
Open a terminal shell and execute the command below to connect to Azure. A login page will prompt you to enter your credentials:
az loginNOTE : If you have multiple subscriptions, please make sure that the subscription that you would like to work on has the flag “isDefault”: true. If it is not the case execute the following command :
az account set –subscription <id>, where <id> is the subscription id.
Create the Azure resource group
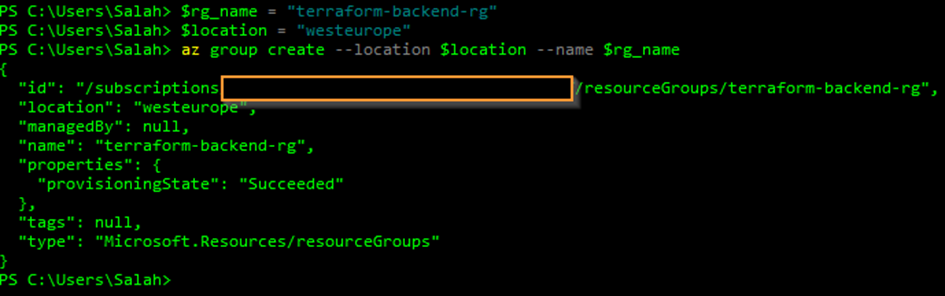
 $rg_name = "terraform-backend-rg"
 $location = "westeurope"
 az group create --location $location --name $rg_name
You should have something like this if the creation is successful :
Create the Azure storage account :
 $st_name ="terraformbackendst001"
 az storage account create --name $st_name `
 --resource-group $rg_name `
 --location $location `
 --sku Standard_LRS `
 --kind StorageV2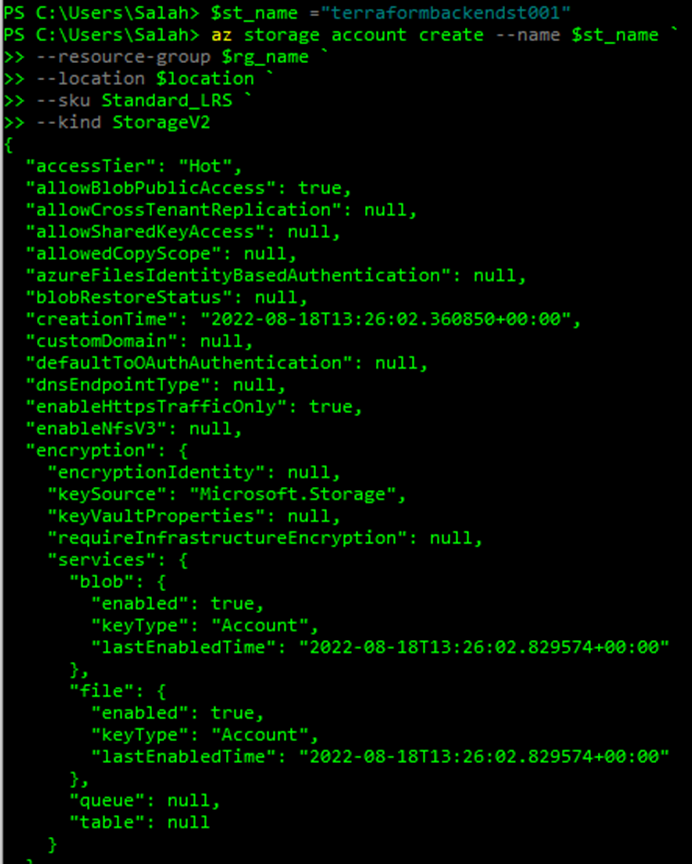
NOTE: The storage name must only contains letters and numbers.For more information about Azure storage, SKU and the different options, visit the link below : https://docs.microsoft.com/en-us/azure/storage/
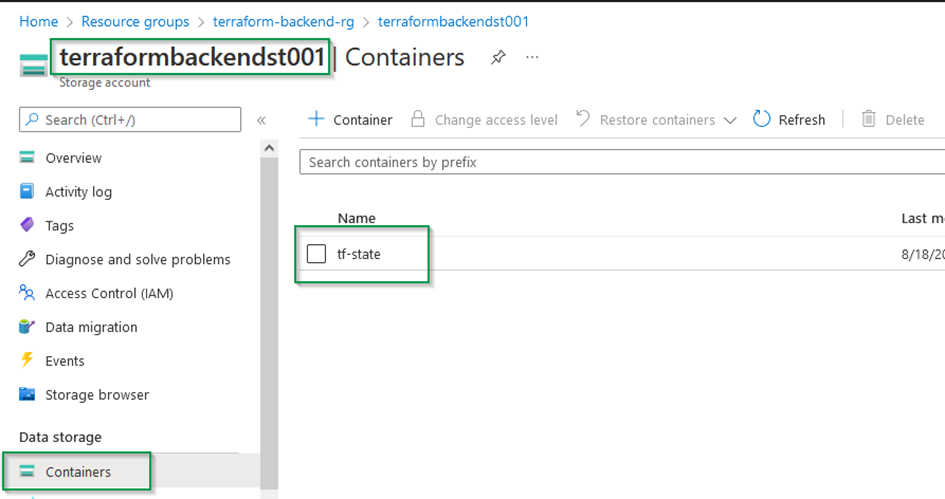
Create the blob container in the file storage using the commands below :
 $container_name = "tf-state"
 $account_key = az storage account keys list -g $rg_name -n $st_name | ConvertFrom-Json
 az storage container create --name $container_name --public-access container --account-name $st_name --account-key $account_key[0].value
If everything is done correctly we should have something like this in the CLI response :

And in the Azure portal, something like this :
Init Terraform Backend
Now we have our backend ready for our state, we should initialize it.
To do so, we will need to create some files inside a new folder named : terraform-aks
Using VS code, create these new files inside the folder terraform-aks
- terraform.tf : Contains the configuration related to the backend and the required providers
- provider.tf : Contains the configuration related to the providers. For our example, we will need only the subscription id used for our deployments.
NOTE : It is not mandatory to name these files as described above, but you still need to have the file extension .tf in the end of the file names.
File terraform.tf :
 terraform {

   required_version = ">= 0.13"

   required_providers {
     azurerm = {
       version = "2.49.0"
     }
   }

      backend "azurerm" {
         resource_group_name  = "terraform-backend-rg"
         storage_account_name = "terraformbackendst001"
         container_name       = "tf-state"
         key                  = "tfstate.infrastructure"
         subscription_id      = "xxxxxxx-xxxxx-xxx-xxxx-xxxxxxxxxxxx"
     }
 }
File provider.tf :
 # Provider name
 provider "azurerm" {
     features {}
     subscription_id      = "xxxxxxx-xxxxx-xxx-xxxx-xxxxxxxxxxxx"
 }
NOTE : Please note that you have to change the subscription id accordingly. You can have the subscription id either from the Azure portal or from the Azure CLI.
In a PowerShell command line, open the folder terraform-aks and execute the following commands :
terraform init After the execution of the command, you will see something like this :

NOTE : If you have an error like below stating something like :Error building ARM Config: obtain subscription(xxx-xxxxxx-xxxxxxxxx-xxxxxx-xxxxxx) from Azure CLI: parsing json result from the Azure CLI: waiting for the Azure CLITry to login again to Azure using the command : az login
You can now check the state generated in the container tf-state using Azure porta

Create resource group using Terraform
In this section we will create the resource group that will host our Azure Kubernetes Service using Terraform.
For this matter, we will create a terraform module that handles resource group creation.
Inside the root folder terraform-aks, create a new folder named : modules.
Inside the folder modules, create a new folder named az-rg that will contain the module that will manage the creation of our resource groups.
According to terraform documentation (https://www.terraform.io/language/modules/develop ), each module should consists of three files :
- Input variables to accept values from the calling module.
- Output values to return results to the calling module, which it can then use to populate arguments elsewhere.
- Resources to define one or more infrastructure objects that the module will manage.
In our case, we will be creating these files inside our module az-rg :
- az-rg-main.tf
- az-rg-outputs.tf
- az-rg-variables.tf
File az-rg-main.tf
 #######################################################
 #           Ressource group
 #######################################################

 resource "random_string" "random" {
   length  = 5
   special = false
   upper   = false
 }
 resource "azurerm_resource_group" "rg" {
   name     = "${var.name}-${random_string.random.result}"
   location = var.location
   tags     = var.tags
 }
File az-rg-variables.tf
 variable "name" {
   type        = string
   description = "This variable defines the name of the resource"
 }

 variable "location" {
   type        = string
   description = "This variable defines the location of the resource"
 }

 variable "tags" {
   type = object({
     project     = string
     location    = string
     CreatedBy  = string
   })
   description = "This variable defines the resources tags"
 }
File az-rg-outputs.tf
 output "az_rg_id" {
   value = azurerm_resource_group.rg.id
 }
 output "az_rg_name" {
   value = azurerm_resource_group.rg.name
 }
Now, we will create a file named locals.tf in the root of our project.
This file contains some variables that can be reused across all our project. It is not mandatary, but I highly recommend to use such file if you want to keep your code clean and maintainable over time.
NOTE : For more information about local files, you can check the link below :https://www.terraform.io/language/values/locals
Our local file should look something like :
 locals {

 #################################################
 #           Project information
 #################################################
     company                     = "toto"
     code_project                = "test001"
     application_name            = "terraformaks"

     resource_prefix             = "${lower(local.company)}-${lower(local.code_project)}-${lower(local.application_name)}"
     resource_prefix_attached    = "${lower(local.company)}${lower(local.code_project)}${lower(local.application_name)}"


 #################################################
 #           Global variables
 #################################################

     location                    = "westeurope"
     azure_subscription_id       = "xxxxx-xxxx-xxxx-xxxx-xxxxxxxxxx"

 #################################################
 #           Global tags
 #################################################
   tags = {
     project    = local.application_name
     location   = local.location
     CreatedBy = "Terraform"
   }
 }
The file contains variables that can be reused across different modules such as location and name prefixes.
For now, we have our module and local file ready, we will create the file that will trigger our module deployment.
For this purpose, we will create a new file called “main.tf” in the root of the project.
 ###################################################################################
 #           Instantiate the global components
 ###################################################################################
 module "mod_rg" {
     source                      = "./modules/az-rg"
     name                        = "${local.resource_prefix}-rg"
     tags                        = local.tags
     location                    = local.location
 }
In this file, we call the module responsible of creating resource groups and we pass different variables declared in our local file.
We will need to execute again the init command in order to install the module that handles resource group. Please make sure that you are in the root folder of the project !
terraform init Next, we will execute the following command that checks our scripts and the execution outcome. This command will not execute the script yet in our infrastructure, it will only checks if terraform can execute the scripts.
terraform plan If everything is OK, we should have something like the screenshot below :
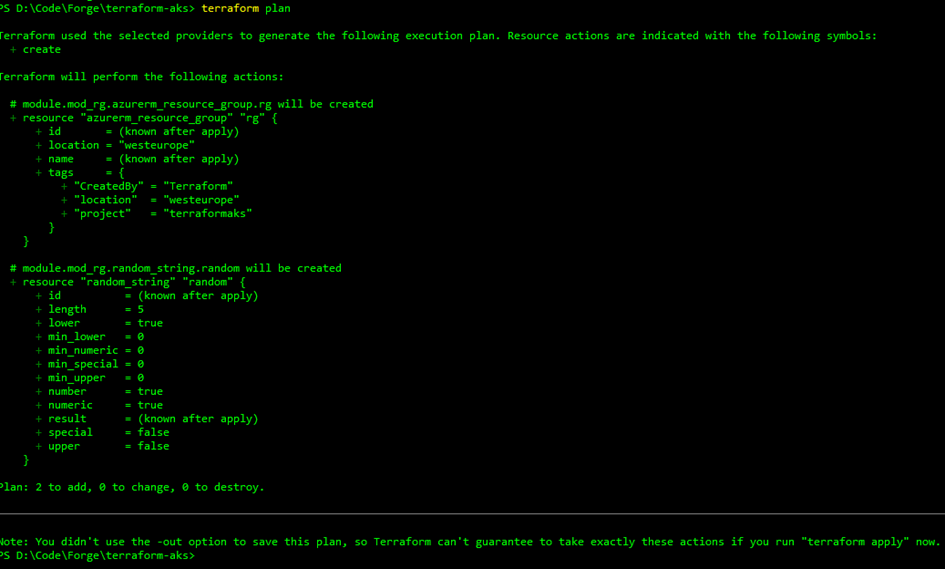
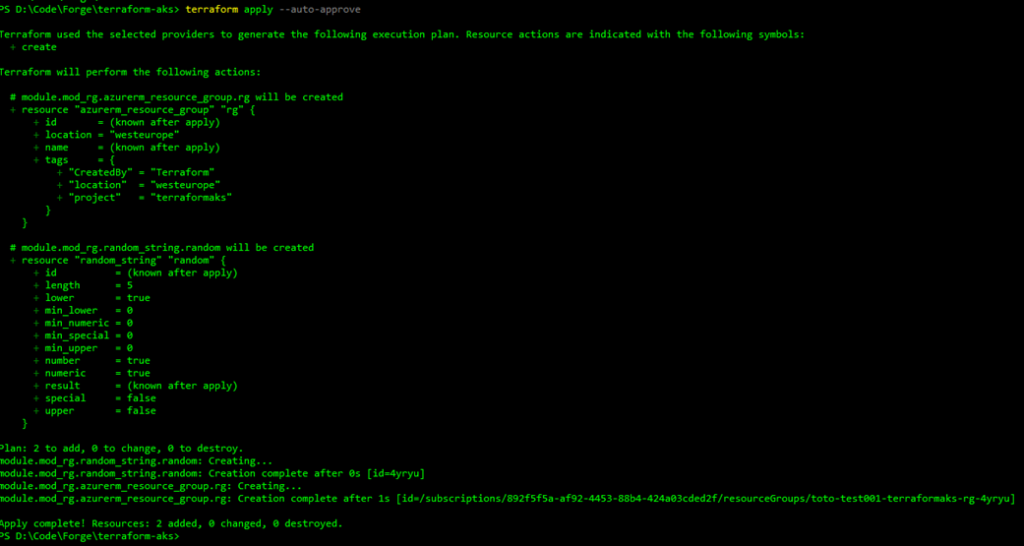
Wonderful ! Our plan was executed correctly and now we can apply our changes using the following command :
terraform apply --auto-approveNOTE : The auto-approve argument is used to skip the cli prompt to confirm the deployment.
After the deployment is completed we can see the output below :
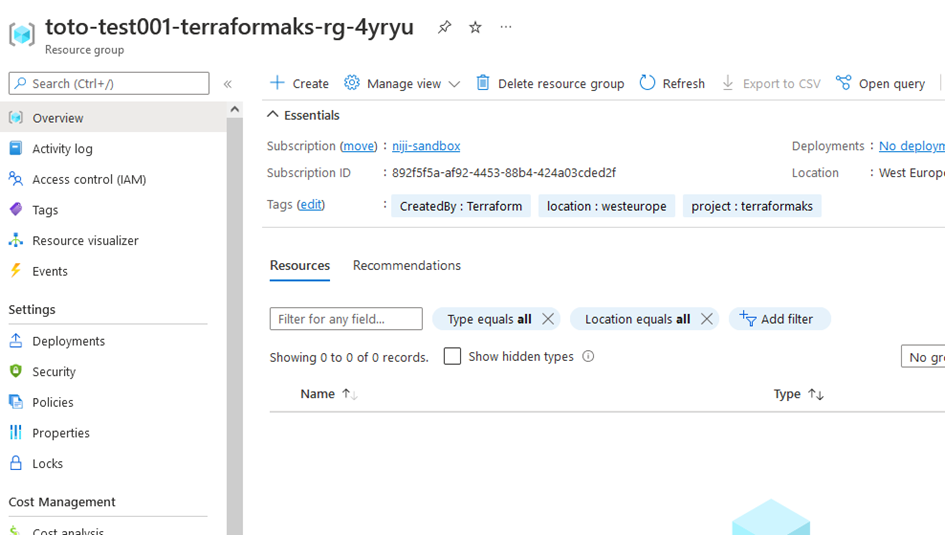
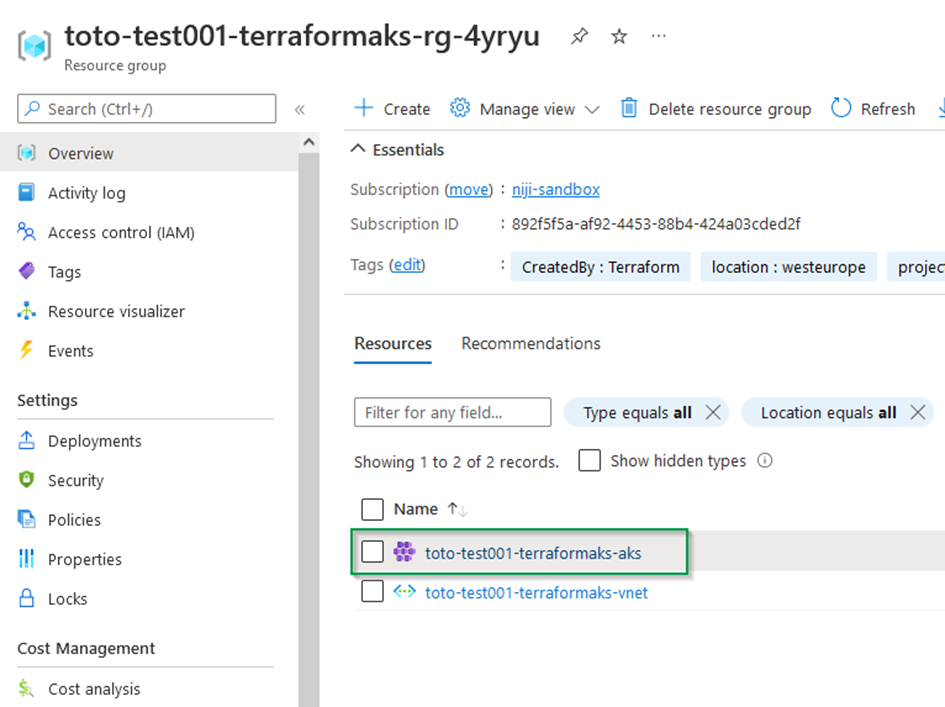
And in the Azure portal :
Create Virtual network using Terraform
The network topology that will be used for our cluster is Azure CNI.
NOTE : For more information about network concepts in AKS, please refer to this link :https://docs.microsoft.com/en-us/azure/aks/concepts-network
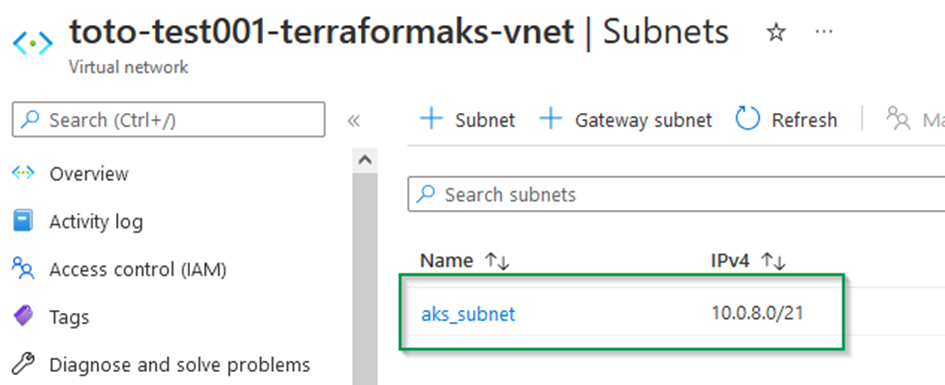
We need therefore to create a Virtual network with a CIDR range of 10.0.0.0/16 and a dedicated subnet for our cluster with a CIDR range of 10.0.8.0/21.
Like for the resource group, we will create a dedicated module to handle vnet and subnet creation.
Under the folder modules, create a new folder named : az-vnet and the following files :
- az-vnet-main.tf : Handle the Vnet resource
- az-vnet-outputs.tf : output variables from the module
- az-vnet-variables.tf : input variables used to create the module.
File az-vnet-main.tf :
 #######################################################
 #           VNET
 #######################################################

 resource "azurerm_virtual_network" "vnet" {
   name                = var.vnet_name
   address_space       = [var.address_space]
   resource_group_name = var.resource_group_name
   location            = var.location

   tags = var.tags
 }

 #######################################################
 #           Subnet
 #######################################################

 resource "azurerm_subnet" "subnet" {
   depends_on                                     = [azurerm_virtual_network.vnet]
   count                                          = var.count_instances
   name                                           = var.subnet_data[count.index].subnet_name
   resource_group_name                            = var.resource_group_name
   virtual_network_name                           = var.vnet_name
   address_prefixes                               = [var.subnet_data[count.index].subnet_cidr]
   service_endpoints                              = var.subnet_data[count.index].service_endpoints
   enforce_private_link_endpoint_network_policies = var.subnet_data[count.index].enforce_private_link_endpoint_network_policies
 }
File az-vnet-outputs.tf
 output "az_vnet" {
   value = azurerm_virtual_network.vnet
 }

 output "az_subnet" {
   value = azurerm_subnet.subnet
 }
File az-vnet-variables.tf
 variable "vnet_name" {
   type        = string
   description = "This variable defines the vnet name"
 }

 variable "address_space" {
   type        = string
   description = "This variable defines the adress space used by the Vnet"
 }

 variable "resource_group_name" {
   type        = string
   description = "This variable defines the resource group name"
 }

 variable "location" {
   type        = string
   description = "This variable defines the location of the resource"
 }

 variable "tags" {
   type = object({
     project     = string
     location    = string
     CreatedBy  = string
   })
   description = "This variable defines the resources tags"
 }

 variable "count_instances" {
   type        = number
   description = "This variable defines the number of instances"
   default = 1
 }

 variable "subnet_data" {
   type = list(object({
     subnet_name = string
     subnet_cidr = string
     service_endpoints = list(string)
     enforce_private_link_endpoint_network_policies = bool
   }))
 }

 variable "service_endpoints" {
   description = "Subnet Service Endpoints."
   type        = list(string)
   default     = []
 }
Add the following section to the local file :
 #################################################
 #           Vnet data
 #################################################

 vnet_default_cidr = "10.0.0.0/16" #Total of 65,536 adresses
 subnet_cidr = "10.0.8.0/21" #Total of 2,048 adresses
 subnet_data_count = length(local.subnet_data)

 subnet_data = [
         {
             subnet_name = "aks_subnet"
             subnet_cidr = local.subnet_cidr
             service_endpoints = []
             enforce_private_link_endpoint_network_policies = false
         }
     ]
 }
And update the main.tf file with the following section :
 module "mod_vnet_subnet" {
     source                  = "./modules/az-vnet"
     vnet_name               = "${local.resource_prefix}-vnet"
     tags                    = local.tags
     location                = local.location
     resource_group_name     = module.mod_rg.az_rg_name
     address_space           = local.vnet_default_cidr
     count_instances         = local.subnet_data_count
     subnet_data             = local.subnet_data
 }
Apply again the following commands and make sure the resources are created correctly in Azure :
terraform plan
terraform apply --auto-approve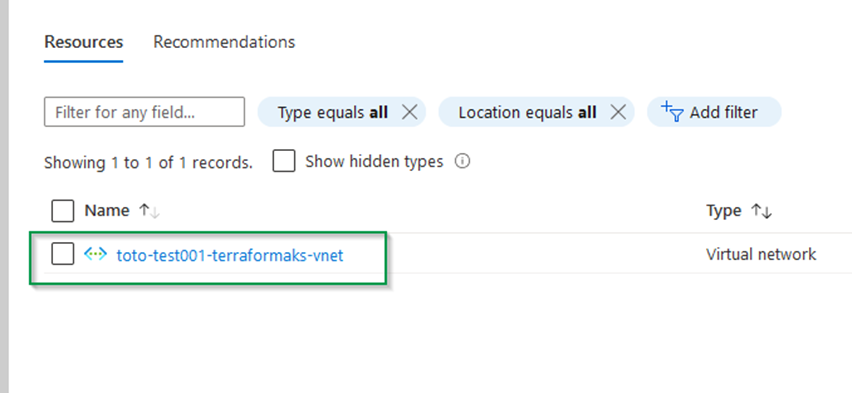
Create Azure Kubernetes Service using Terraform
For our test today, We will create an AKS cluster with the following options :
- Kube version : 1.22.11
- subnet aks_subnet (Azure CNI Network).
- 1 node ( no autoscaling enabled).
- The vm size : Standard_B2s ( 2 vcpus, 4 GiB memory )
- OS disk size : 60 GB.
Under the folder modules, create a new folder named : az-aks and the following files :
- az-aks-main.tf : Handle the AKS resource
- az-aks-outputs.tf : output variables from the module
- az-aks-variables.tf : input variables used to create the module.
File az-aks-main.tf
 #######################################################
 #           AKS
 #######################################################

 resource "azurerm_kubernetes_cluster" "aks" {
   name                = var.name
   location            = var.location
   resource_group_name = var.resource_group_name
   dns_prefix          = var.dns_prefix
   kubernetes_version  = var.kubernetes_version

   # Default node pool

   default_node_pool {
     name                = var.default_node_pool.name
     node_count          = var.default_node_pool.node_count
     vm_size             = var.default_node_pool.vm_size
     availability_zones  = var.default_node_pool.availability_zones
     enable_auto_scaling = var.default_node_pool.enable_auto_scaling
     min_count           = var.default_node_pool.min_count
     max_count           = var.default_node_pool.max_count
     max_pods            = var.default_node_pool.max_pods
     os_disk_size_gb     = var.default_node_pool.os_disk_size_gb
     type                = var.default_node_pool.type
     vnet_subnet_id      = var.vnet_subnet_id
   }

    role_based_access_control {
     enabled = true
   }

   # Network profile
   network_profile {
     network_plugin     = var.network_plugin
     network_policy     = var.network_policy
     service_cidr       = var.service_cidr
     dns_service_ip     = var.dns_service_ip
     load_balancer_sku  = var.load_balancer_sku
     docker_bridge_cidr = var.docker_bridge_cidr
   }

  # Identity
     identity {
     type = "SystemAssigned"
   }

   lifecycle {
     prevent_destroy = false
     ignore_changes = [
       default_node_pool[0].node_count
     ]
   }

   tags = var.tags
 }
File az-aks-outputs.tf
 output "az_aks_principal_id" {
   value = azurerm_kubernetes_cluster.aks.kubelet_identity[0].object_id
   description = "AKS principal ID. Refers to MSI XXX_agentpool in the MC resource group"
 }
 output "az_aks_id" {
   value = azurerm_kubernetes_cluster.aks.id
   description = "AKS resource id"
 }

 output "az_aks_name" {
   value = azurerm_kubernetes_cluster.aks.name
   description = "AKS cluster name"
 }
File az-aks-variables.tf
 variable "name" {
   type        = string
   description = "The name of the AKS cluster"
 }

 variable "location" {
   type        = string
   description = "The location of the AKS cluster"
 }

 variable "resource_group_name" {
   type        = string
   description = "The rg name"
 }

 variable "dns_prefix" {
   type        = string
   description = "The DNS prefix name"
 }

 variable "kubernetes_version" {
   type        = string
   description = "The version of kubernetes"
 }

 variable "default_node_pool" {
   type = object({
     name                = string
     node_count          = number
     vm_size             = string
     availability_zones  = list(number)
     enable_auto_scaling = bool
     min_count           = number
     max_count           = number
     max_pods            = number
     os_disk_size_gb     = number
     type                = string
   })
   description = "This variable defines the subnets data to be created"
 }

 variable "network_plugin" {
   type        = string
   description = "Network plugin for kubenretes network overlay (azure or kubnet)."
 }

 variable "vnet_subnet_id" {
   type        = string
   description = "Network plugin for kubenretes network overlay (azure or kubnet)."
 }

 variable "network_policy" {
   type        = string
   description = "network policy (azure or calico)."
 }

 variable "service_cidr" {
   type        = string
   description = "kubernetes internal service cidr range."
 }

 variable "dns_service_ip" {
   type        = string
   description = "kubernetes internal that will be used by kube_dns."
 }

 variable "load_balancer_sku" {
   description = "Load balancer sku."
   type        = string
   default     = "Standard"
 }

 variable "docker_bridge_cidr" {
   type        = string
   description = "kubernetes internal docker service cidr range."
   default     = "172.17.0.1/16"
 }

 variable "tags" {
   type = object({
     project     = string
     location    = string
     CreatedBy  = string
   })
   description = "This variable defines the resources tags"
 }
Apply again the following commands and make sure the resources are created correctly in Azure :
terraform plan
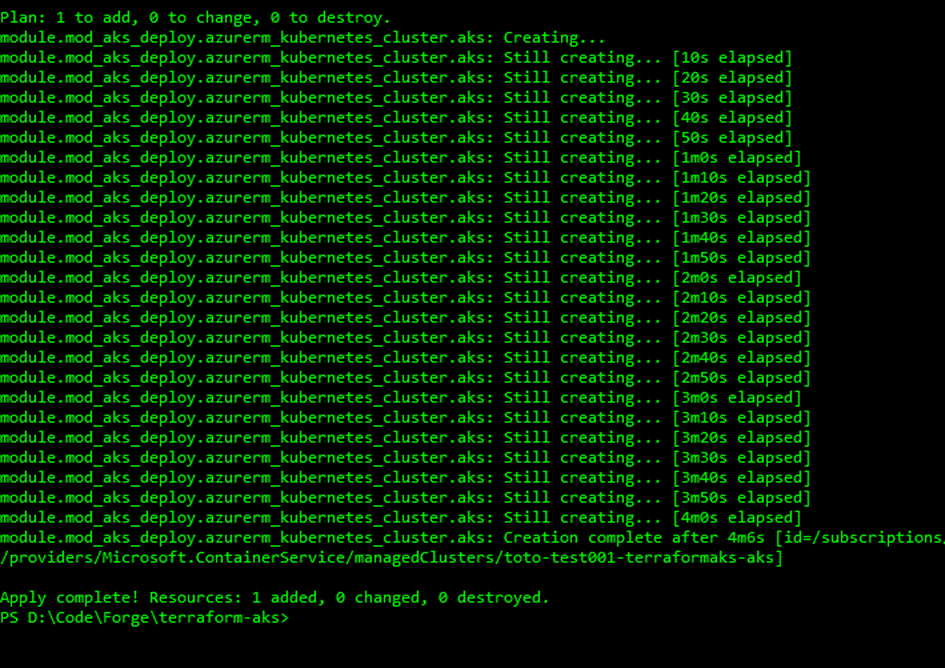
terraform apply --auto-approveYou should have the following output from Terraform CLI, once the command finishes ( it may takes some minutes before completion).
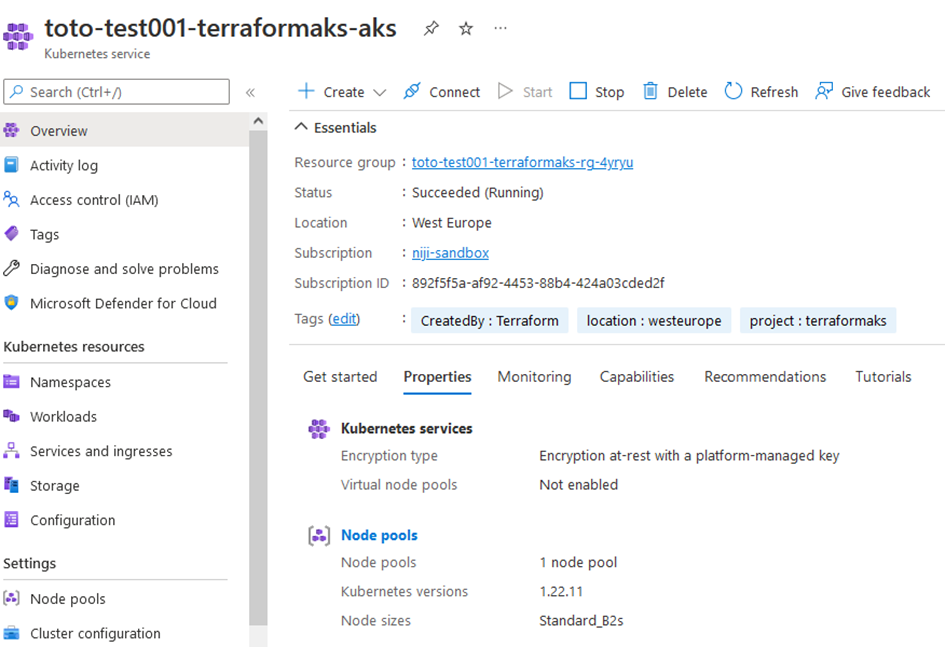
Voila 😊,
Congratulations, you go through all the steps to create your AKS cluster using terraform as IaC platform.
Final words …
In this tutorial, we saw how we create an AKS cluster using terraform as an infrastructure automation tool.
First, we set up Terraform backend to store state in Azure using Azure blob storage, and then we created scripts to create resource group, Virtual network and finally The Azure Kubernetes Service.
The complete code source is available in the following repository : https://github.com/salahlemtiri/terraform-aks
I hope this topic was helpful to start using Terraform to automate Azure resource creation.
Leave a comment if you find this article useful, and I will be pleased to answer your questions.
Salah.
Thank you for sharing