Introduction
Today’s topic will focus on deploying ASP.NET 5 Web API to Azure Kubernetes Service (AKS) from an image hosted in Azure container registry, and use HTTPS Nginx Ingress controller.
In this article, I will not go over the steps of creating the Web Api (SampleWebApi) application, neither the creation of the private Docker repository, as this topic was covered by my previous post : https://lemtirisalah.com/generate-asp-net-5-webapi-docker-image-and-push-it-to-azure-container-registry-acr/
So, we will assume that our ACR is already set up and our application is already pushed to the repository.
Below is an overview picture about our deployment today :
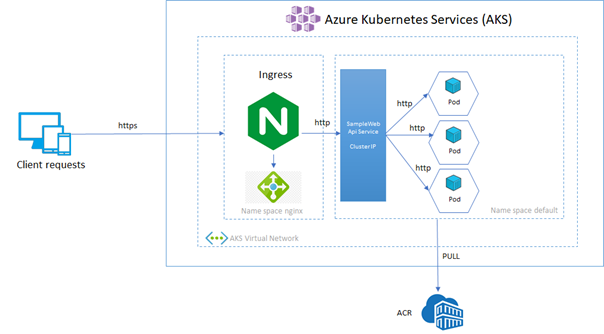
Below some important notes about the targeted architecture:
- The AKS cluster will contains two name spaces, one dedicated for the Nginx reverse proxy and Cert Manager, and the default one for our application. For simplicity matter, we are not going to create a separate name space for our back end applications.
- The reverse proxy is responsible of making the SSL termination. All the traffic are encrypted and decrypted at the ingress layer, so the communications to our back end will use http.
- The service exposing our back end is an AKS cluster IP service. For more information about Kubernetes services please visit this link : https://kubernetes.io/fr/docs/concepts/services-networking/service/
- The back end application will consists of the application “SampleWebApi” that we will pull from the Azure container registry (ACR) with 3 replicas.
Create the Azure resources
In the previous example (https://lemtirisalah.com/generate-asp-net-5-webapi-docker-image-and-push-it-to-azure-container-registry-acr/) we created a resource group called “web-api-sample-rg” and a private Docker repository called “webapisampleacr”. We will be using the same resource group to create our AKS cluster.
IMPORTANT : AKS networking supports kubenet and CNI networking. In this topic we will cover the kubenet (by default), as we are not going to implement advanced networking features. For more information about the topic, please visit this link : https://docs.microsoft.com/fr-fr/azure/aks/concepts-network#azure-virtual-networks
Create the managed Identity :
$principal_resource_id=(az identity create --name aks-managed-identity --resource-group web-api-sample-rg --query id --output tsv). This command will create the managed identity, and store the principal resource id in a variable.
TIP : The managed identity avoid us creating Service principal and assign secrets manually. The identity is managed by Azure.
Create the AKS Cluster
 az aks create `
 --resource-group web-api-sample-rg `
 --name aks-demo `
 --location westeurope `
 --assign-identity $principal_resource_id `
 --kubernetes-version 1.17.16 `
 --node-count 1 `
 --generate-ssh-keys `
 --node-vm-size Standard_B2s
For test purposes, we will need one node for our cluster. The node’s size will be “Standard_B2s family”. If you want to check the available vm list sku, you can run the command : az vm list-skus –location westeurope
The cluster creation can take up to 5~6 minutes.
Then, we need to assign the role ACR pull to our newly created manage identity.
$principal_id=(az identity show --name aks-managed-identity -g web-api-sample-rg --query principalId -o tsv)
$subsc_id=(az account show --query id --output tsv)
az role assignment create --assignee $principal_id --scope /subscriptions/$subsc_id/resourceGroups/web-api-sample-rg/providers/Microsoft.ContainerRegistry/registries/webapisampleacr --role "AcrPull"
Open Kubernetes Dashboard
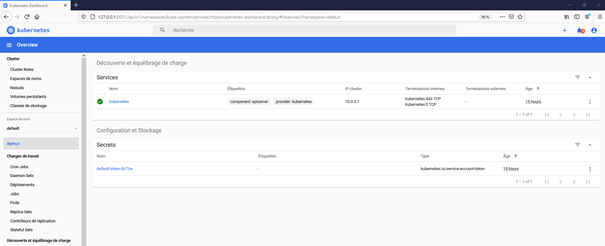
Now we will open the Kubernetes Dashboard from our local host. It is a very useful tool to check visually the status of pods and the different kube controls.
Get the credentials from the AKS cluster :
az aks get-credentials --resource-group web-api-sample-rg --name aks-demoOpen the Dashboard :
az aks browse --resource-group web-api-sample-rg --name aks-demoYou will be prompted to authenticate. Choose, the Kubeconfig options and click on connection. If everything is OK, you should see the screen below :
Set up imagePullSecrets in Kubernetes
We need to configure in the cluster the image pull secret that will be used to pull the Docker images. For more information about K8S secrets, please visit this link : https://kubernetes.io/fr/docs/tasks/configure-pod-container/pull-image-private-registry/
Save some variables locally
 $acr_name = "webapisampleacr.azurecr.io"
 $acr_uname = "webapisampleacr"
 $acr_password = (az acr credential show -n webapisampleacr --query passwords[0].value -o tsv)
Create the K8S secret :
kubectl create secret docker-registry acr-secret `
   --docker-server=$acr_name `
   --docker-username=$acr_uname `
   --docker-password=$acr_password
Create the deployment and service controls
In this section, we create the deployment and service file of our application SampleWebApi.
apiVersion: apps/v1
kind: Deployment
metadata:
  name: sample-webapi-deploy
spec:
  replicas: 3
  selector:
    matchLabels:
      app: sample-webapi-pod
  template:
    metadata:
      labels:
        app: sample-webapi-pod
    spec:
      containers:
      - name: sample-webapi-container
        image:  webapisampleacr.azurecr.io/salah/webapi:1.0
        imagePullPolicy: Always
        resources:
          limits:
            memory: "128Mi"
            cpu: "250m"
        ports:
        - containerPort: 80
      imagePullSecrets:
      - name: acr-secret
---
apiVersion: v1
kind: Service
metadata:
  name: sample-webapi-service
spec:
  selector:
    app: sample-webapi-pod
  ports:
  - port: 80
  type: ClusterIP
In the deployment section, we describe:
- The name of the deployment.
- The replicas of pod SampleWebApi.(In this example, there are 3 replicas)
- The container repository (webapisampleacr.azurecr.io/salah/webapi:1.0)
- The resource limit
- The imagePullSecrets we defined earlier to pull Docker image
In the service section, we describe:
- The pods exposed by the service
- The targeted port
- The type of the service. In this case, the service will be “ClusterIP”. The service will not be exposed outside the cluster. The access will be granted by the Ingress controller.
TIP : For more information about the different services used by Kubernetes. Please refer to this link : https://kubernetes.io/fr/docs/concepts/services-networking/service/
Save the file locally and name it “deploy.yaml”, and execute the command :
kubectl apply -f .\deploy.yamlInstalling Nginx ingress controller
Nginx will act as a reverse proxy to our cluster, and define the ingress rules. To do so, we will install the ingress controller with HELM.
TIP : Helm is the package manager for Kubernetes. It helps you control Kubernetes deployments using charts.The main role of Helm is to help define, install and update complex Kubernetes applications. For more information, please visit this link : https://helm.sh/
First of all, make sure that HELM 3 is installed, then run the following command to add the Nginx repo to your cluster.
 helm repo add ingress-nginx https://kubernetes.github.io/ingress-nginx
 helm repo update
Then, install the Nginx ingress in the namespace ingress
 helm install app-ingress ingress-nginx/ingress-nginx `
      --namespace ingress `
      --create-namespace `
      --set controller.replicaCount=2 `
      --set controller.nodeSelector."beta\.kubernetes\.io/os"=linux `
      --set defaultBackend.nodeSelector."beta\.kubernetes\.io/os"=linux
Make sure the service app-ingress-ingress-nginx-controller exposes an external IP using the command :
kubectl get services --namespace ingress
To be able to use SSL, we need a DNS entry for the external API. If you have already a DNS name, the easiest way to do is to add a subdomain using the “A” record, and add the IP address as your host.
After some minutes, you can check your host and verify it resolves to the external IP address.

Then, create the ingress yaml file that define our rules:
apiVersion: networking.k8s.io/v1beta1
kind: Ingress
metadata:
  annotations:
    nginx.ingress.kubernetes.io/app-root: /swagger
    kubernetes.io/ingress.class: nginx
  name: approot
  namespace: default
spec:
  rules:
  - host: samplewebapi.gtw.az.lemtirisalah.com
    http:
      paths:
      - backend:
          serviceName: sample-webapi-service
          servicePort: 80
        path: /
Save the file locally and name it “app-ingress.yaml” . Then execute the command
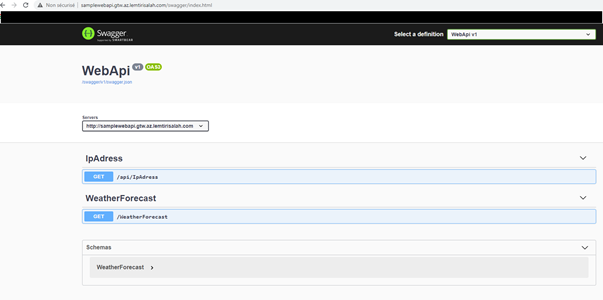
kubectl apply -f .\app-ingress.yamlCongratulations! You have deployed your Cluster and setup Nginx as your reverse proxy.
Check your host (in my case: (http://samplewebapi.gtw.az.lemtirisalah.com/), and you will get the swagger screen displayed :
Setting up SSL
In order to manage our certificate, we will be using “Cert Manager”.
Cert Manager is a native Kubernetes certificate management controller. It can help with issuing certificates from a variety of sources, such as Let’s Encrypt, HashiCorp Vault, Venafi, a simple signing key pair, or self signed.It will ensure certificates are valid and up to date, and attempt to renew certificates at a configured time before expiry. For more information about Cert Manager, visit this link : https://cert-manager.io/docs/
Execute this command to disable validation on the cert-manager.io
kubectl label namespace ingress cert-manager.io/disable-validation=trueAdd the HELM repo jetstack
 helm repo add jetstack https://charts.jetstack.io
 helm repo update
Install the chart cert-manager with the following command :
helm install cert-manager jetstack/cert-manager `
--namespace ingress `
--version v0.16.1 `
--set installCRDs=true `
--set nodeSelector."kubernetes\.io/os"=linux `
--set webhook.nodeSelector."kubernetes\.io/os"=linux `
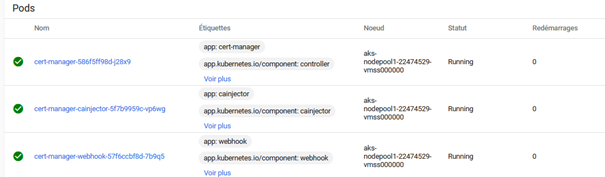
--set cainjector.nodeSelector."kubernetes\.io/os"=linuxMake sure that the pods are running inside the namespace ingress :
After that, create a file “ssl-issuer.yaml”, with the following content :
apiVersion: cert-manager.io/v1alpha2
kind: ClusterIssuer
metadata:
  name: letsencrypt
spec:
  acme:
    server: https://acme-v02.api.letsencrypt.org/directory
    email: YOUR-EMAIL
    privateKeySecretRef:
      name: letsencrypt
    solvers:
    - http01:
        ingress:
          class: nginx
Change the field “YOUR-EMAIL” by your real mail adress.
Execute the file using :
kubectl apply -f .\ssl-issuer.yamlIn the final step, update the app-ingress.yaml file as follows :
apiVersion: networking.k8s.io/v1beta1
kind: Ingress
metadata:
  annotations:
    nginx.ingress.kubernetes.io/app-root: /swagger
    kubernetes.io/ingress.class: nginx
    cert-manager.io/cluster-issuer: letsencrypt
  name: approot
  namespace: default
spec:
  tls:
  - hosts:
    - samplewebapi.gtw.az.lemtirisalah.com
    secretName: tls-secret
  rules:
  - host: samplewebapi.gtw.az.lemtirisalah.com
    http:
      paths:
      - backend:
          serviceName: sample-webapi-service
          servicePort: 80
        path: /
Finally, make sure that the certificate is in ready status :
kubectl get certificate
Check the application host, you will now access the application in HTTPS, and the certificate is valid.

Conclusion
In this lab, we saw how we provisioned an AKS cluster in Azure, deploy our Web API .NET 5 Web API, set Nginx as ingress controller and configure Cert Manager to manage SSL certificates.
Leave a comment if you find this article useful, and I will be pleased to answer your questions if you have any problem.
Salah.
Be First to Comment